Wi-Fi and Remote Access
Wi-Fi (eduroam)
eduroam is our recommended wireless service for students and staff, and gives you internet access at the University of Oxford and when you’re visiting other participating universities. To connect to eduroam, you need a Remote Access account (provided by the University’s central IT Services).
Guest Wi-Fi (OWL)
OWL WiFi is an alternative way of getting online for staff and students who cannot use eduroam, and can be used to support WiFi access for official visitors.
Virtual Private Network (VPN)
There are two VPN services available to members of the Statistics Department: the University’s central VPN (Cisco AnyConnect), and the Department’s Stats VPN (FortiClient). The University’s VPN service allows devices to remotely connect to the University network, required by some web pages and online resources. And the Department’s VPN service allows devices to remotely connect to internal Department resources, eg. the HPC.
How to connect to the Department’s Stats VPN (FortiClient)
Set up
Check your access is working by logging in to https://vpnssl2.stats.ox.ac.uk:20443/ using a web-browser and your SSO credentials. (If this doesn’t work, please contact Stats IT so that we can help.)
After a successful login the following page should be shown:
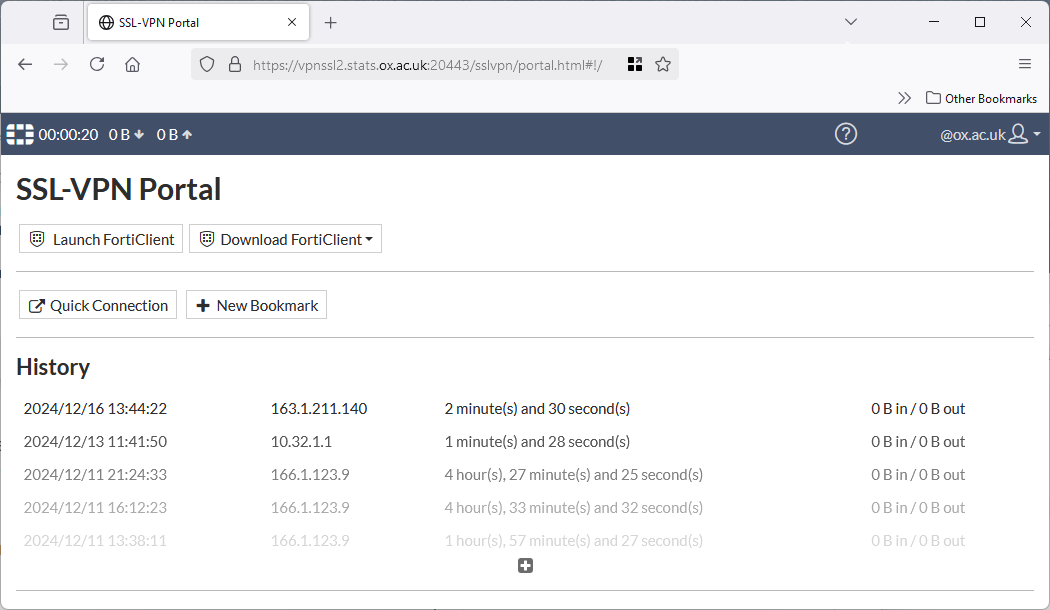
Download the required FortiClient software by selecting your platform from the drop-down menu provided. You may also download the VPN client software from Fortinet directly - there are many options, please use ‘FortiClient VPN’ only. Please note you need a recent version of the FortiClient software to support SSO login as older versions lack this feature.
Example screenshots of the configuration pages for various systems are included below to highlight the necessary settings.
Configuring FortiClient
Official FortiClient software is available for the following systems:
Apple
Android
Linux
Windows
Install the software appropriate for your system in the standard fashion for your device. If you see any security warnings that are not familiar, please stop and seek advice.
Once installed, load the VPN client and provide it the following details:
Server: |
vpnssl2.stats.ox.ac.uk |
Port: |
20443 |
Username: |
(Your SSO username e.g. abcd1234@OX.AC.UK) |
Password: |
(Your SSO password) |
If the client supports “certificate checking” please ensure that this option is switched on. This is an important safety and security feature. On Android you want “Single Sign On” to be enabled.
On Linux once configured the way to start a new VPN session is to click on the “SAML login” button which will use your web browser to connect to Microsoft cloud to carry out the secure SSO login with MFA challenge (which will only happen if not successfully completed recently).
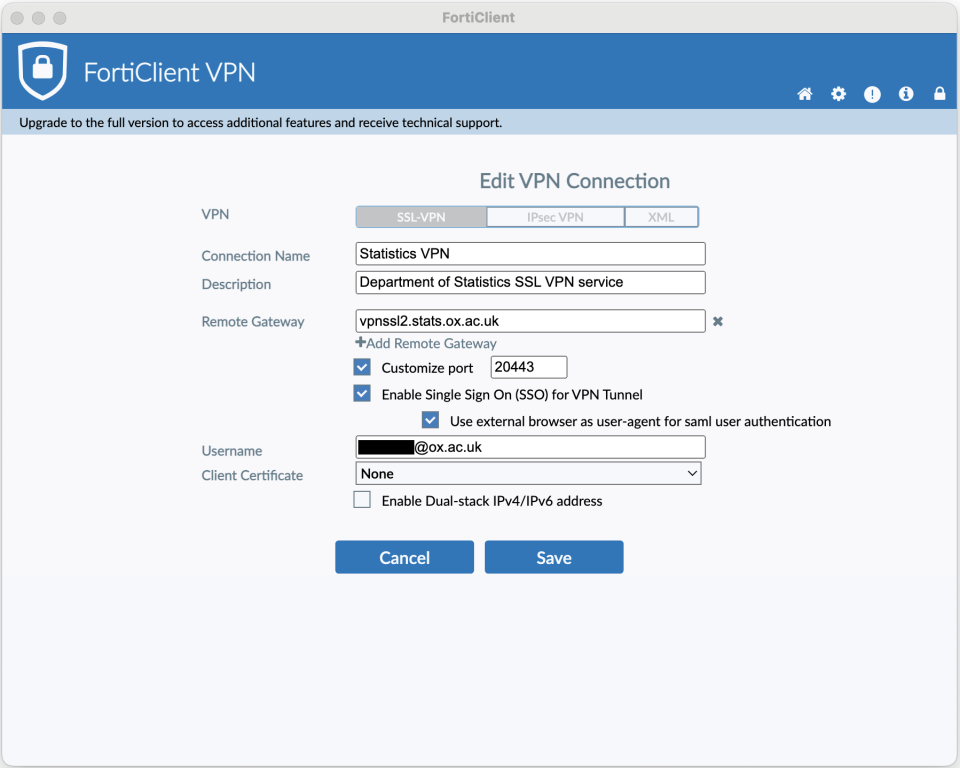
MacOS FortiClient settings example
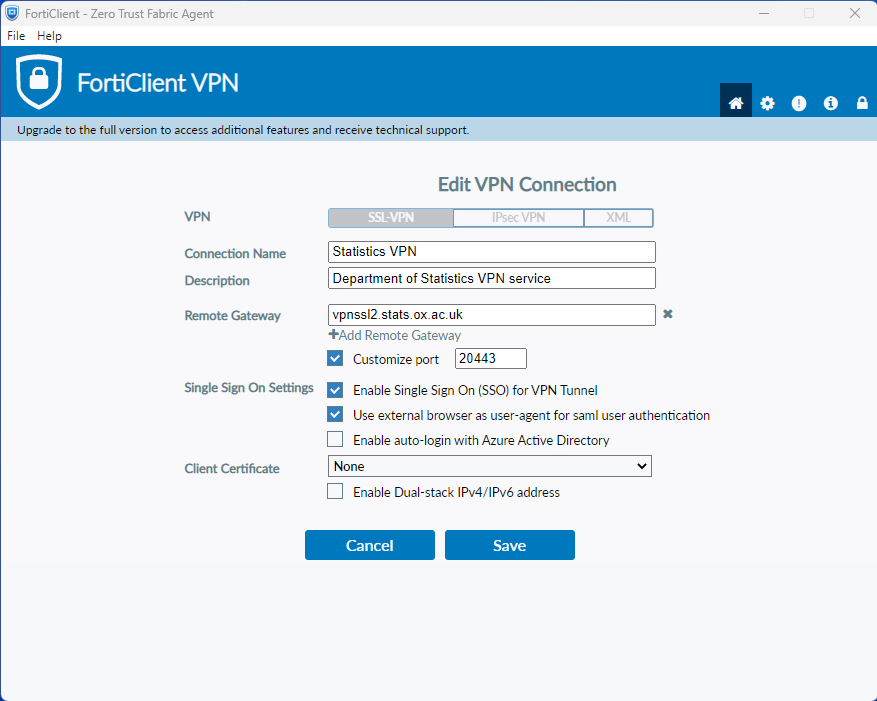
Windows 11 FortiClient settings example
Configuring Openfortivpn
Openfortivpn has not been successfully configured (as of Dec 2024) to work with Microsoft SSO MFA, please use the FortiClient instead.
Mapping Your Home Directory
Windows Users
When using the Statistics VPN, your home directory is not automatically mapped to the P: drive as it happens when you log in to a Departmental desktop; this is due to your computer not being part of our Active Directory domain. Also, the folder path we use inside the domain will not work from outside.
Should you need to access your home directory when connected to the Statistics VPN, you can map the SaMBa-shared folder to a drive by using the full path to the shared folder:
Connect to the Statistics VPN.
Right-click on Computer (either on your desktop or your Start menu) and select Map network drive…
On the Map Network Drive window, select the drive letter you want to use; for example P:
Type the path to the folder: \\fs0x.stats.ox.ac.uk\username, where fs0x is the name of your P: drive file server and username is your Statistics username; for example \\fs02.stats.ox.ac.uk\alice.
If you are not sure which of fs01, fs02, or fs03 you are using try each in turn.
If you are going to use this repeatedly, check ‘Reconnect at logon’.
Check ‘Connect using different credentials’.
Click Finish.
On the new Windows Security window, type in your Statistics username (in the form STATS\username) and password.
Click OK.
Mac Users
In the Finder, click on the Go menu and select Connect to Server.
Enter the server address: as smb://fs0x.stats.ox.ac.uk/username, where fs0x is the name of your home directory file server and username is your Statistics username; for example smb://fs02.stats.ox.ac.uk/alice.
If you are not sure which of fs01, fs02, or fs03 you are using try each in turn.
Click the + button to save this as a Favourite Server.
Click Connect and then enter your Statistics username and password when prompted.
Remote Desktop Gateway
The Windows Remote Desktop Gateway allows you to connect to a Windows desktop from outside of the department using any tool that supports the Microsoft Remote Desktop Protocol (RDP). This service is also called wingate.stats.ox.ac.uk.
Who is Remote Desktop Gateway for?
Academics and other members of staff who have a departmental Windows desktop.
The Remote Desktop Gateway allows you to connect to a departmental Windows desktop from outside the Department. You can use an up-to-date Remote Desktop Client to then login to the departmental desktop and operate it as if you were sitting at your desk, including access to your P:\ drive and other services only accessible from inside the Department.
Why is Remote Desktop Gateway necessary?
The Remote Desktop Gateway provides a reasonably secure connection (using SSL) to Windows desktops within the department whereas direct, possibly insecure, remote access is denied.
Requirements
You must have access to an up-to-date Remote Desktop Client application to be able to connect through the Gateway. So far we have only found two clients which allow gateway connections:
The Remote Desktop Connection application installed by default on Windows 8.1 and later, and the iTap mobile RDP for Macs and Linux systems. The first comes free with Windows, the latter has to be purchased separately (it is available in the App Store).
To connect through the Remote Desktop Gateway, we have to configure it to allow you to log through, and then to allow you to log in remotely to your desktop. This means we will need to know your departmental username (not your password; never send your password to anyone, even us) and the hostname of your desktop before you can access the service. Your Windows desktop will need to be rebooted before you can try the service.
It is advisable to have a fast broadband Internet connection where you are, as the Remote Desktop protocol requires more bandwidth than a text-based one (like SSH) to have a satisfactory experience.
Using the service with Remote Desktop Connection
Open Remote Desktop Connection (in Windows 10 via Start menu > Windows Accessories > Remote Desktop Connection)
Type in the hostname of the TARGET machine, i.e. test.stats.ox.ac.uk
Click ‘Show Options’
Click on the ‘Advanced’ tab
Click Settings…
Select ‘Use these TS Gateway server settings’
Server name: |
wingate.stats.ox.ac.uk |
Log-on method: |
Ask for password |
Log-on settings: |
Use my RD Gateway credentials for the remote computer |
Click OK
Click Connect
Type in your departmental credentials to log in to the RD Gateway, i.e. STATS\alice
Click OK
On first connection, acknowledge any warnings about certificates
Once finished, remember to ‘Sign out’ unless you want the session on the TARGET system to persist (i.e. your files remain open and desktop session locked); if so just disconnect (Start > Disconnect)
Using the service with iTap mobile RDP
Start iTap mobile RDP
Click on Preferences
Click on the add button (bottom left) of the Gateway preferences
Type in a meaningful label for these preferences, i.e. Oxford Statistics
Hostname: |
wingate.stats.ox.ac.uk |
Domain: |
STATS |
Quit the Preferences window
Click New.
Type in a meaningful label for this connection, e.g. Statistics Desktop
Type in the host name of the TARGET machine, e.g. pc123.stats.ox.ac.uk
Domain: STATS
Select the gateway preferences you created above, i.e. Oxford Statistics
Quit the new host window
Double-click on the host entry you have just created, i.e. Statistics Desktop
Type in your departmental username and password when prompted, i.e. STATS\alice
SSH Gateway
The SSH Gateway allows you to connect to Linux desktops and servers from outside of the department using any tool that supports the Secure Shell protocol (SSH). This service is also called gate.stats.ox.ac.uk.
Please note if connecting from outside the University of Oxford you will first need to open a VPN connection before being able to reach the SSH Gateway.
Who is SSH Gateway for?
Those needing to remotely connect to the department using the SSH protocol, e.g. with ssh, scp, sftp and rsync commands. For those with fast connectivity it is also possible to use X11 forwarding with SSH to support access to graphical X applications.
Once connected to the gateway please do not use it as a compute server, just as a connectivity gateway, and make internal connections to compute servers and desktops as necessary.
If you need to download a lot of data, please be aware that most desktops and servers within the department can initiate direct outgoing connections to remote hosts on the Internet, avoiding any need for the traffic to actually flow through the gateway server itself.
Please remember this is a shared resource often being used by many of your colleagues, resources are finite including bandwidth.
Why is SSH gateway necessary?
The SSH gateway provides a reasonably secure remote access path to desktops and servers within the department where direct inbound access is always denied.
Using the SSH Gateway from Linux
Internet connected remote Linux and UNIX based systems can usually connect with the command:
$ ssh -l username gate.stats.ox.ac.uk
Where username is your Stats login name, eg alice.
If you require X forwarding the -X option is required and depending on connection speed data compression may also help and is available via the -C option.
If you then wish to SSH to an internal host e.g. a desktop or compute server then you will have to perform this as a two-stage SSH:
$ ssh gate.stats.ox.ac.uk
$ ssh pc123
Using the SSH gateway from Windows
The simplest way to connect to a Linux system from a Windows PC is to use the built-in SSH client from a Windows Terminal – a tutorial is available on the Microsoft Learn website.