Getting Started with the Stats HPC
This introductory guide explains how to connect to the Department of Statistics HPC clusters, use shared software modules, submit Slurm jobs, and work with the new shared CephFS storage system.
Overview
The Department of Statistics HPC clusters are:
srf_cpu_01: shared CPU clustersrf_gpu_01: shared GPU clusterswan: research-group-specific clusters
The HPC provides centrally managed software via shared Environment Modules and shared CephFS storage across all compute nodes.
See also:
Storage overview
The HPC provides several different storage areas.
Location |
Purpose |
|---|---|
|
Persistent personal storage |
|
Fast SSD-backed temporary scratch storage |
|
Large-capacity temporary scratch storage |
|
Temporary per-job working directory |
|
Additional personal storage |
Inside Slurm jobs, these variables are automatically available.
Warning
Files under /scratch are automatically deleted after 30 days.
Always copy important results back to persistent storage such as:
$HOME/bitbucket/$USERproject directories
Connecting to the Stats HPC
To copy your files to the Stats HPC and to connect to the HPC, please log into a Slurm login node, eg slurm-hn04. Please check the Intro HPC & Linux presentation slides, for more information especially p.8-11.
Running your test PyTorch Slurm job
This is a sample Slurm job script that let’s you run PyTorch on the HPC. The example job is intentionally very small and may complete quickly.
 1#!/bin/bash
 2#SBATCH --job-name=test_pytorch_gpu
 3#SBATCH --mail-user=YOUR-EMAIL-ADDRESS
 4#SBATCH --mail-type=BEGIN,END,FAIL
 5#SBATCH --partition=standard-gpu
 6#SBATCH --clusters=srf_gpu_01
 7#SBATCH --gres=gpu:1
 8#SBATCH --cpus-per-task=2
 9#SBATCH --mem=4G
10#SBATCH --time=00:10:00
11#SBATCH --output=test_pytorch_gpu_%j.out
12
13set -euo pipefail
14
15# Initialise Environment Modules
16source /etc/profile.d/modules.sh
17
18module purge
19module use /apps/modulefiles/Core
20
21# Load shared PyTorch environment
22module load pytorch/cu124-py311
23
24echo "Running on host: $(hostname)"
25echo "CUDA_VISIBLE_DEVICES: $CUDA_VISIBLE_DEVICES"
26
27echo "SCRATCH_FAST=$SCRATCH_FAST"
28echo "TMPDIR=$TMPDIR"
29
30# Create temporary working directory
31mkdir -p "$SCRATCH_FAST/example-job"
32cd "$SCRATCH_FAST/example-job"
33
34nvidia-smi
35
36python3 - <<'EOF'
37import torch
38
39print("PyTorch version:", torch.__version__)
40print("CUDA available:", torch.cuda.is_available())
41
42if torch.cuda.is_available():
43    print("Using GPU:", torch.cuda.get_device_name(0))
44
45    x = torch.rand(1000, 1000, device="cuda")
46    y = torch.rand(1000, 1000, device="cuda")
47
48    print("Tensor sum (GPU):", (x + y).sum().item())
49else:
50    print("Running on CPU.")
51EOF
The variables $SCRATCH_FAST, $SCRATCH_BULK and $TMPDIR are automatically created for each Slurm job.
These provide temporary storage areas for your job.
Example paths:
/scratch/fast/$USER/slurm-jobs/$SLURM_JOB_ID
/scratch/bulk/$USER/slurm-jobs/$SLURM_JOB_ID
These directories are created automatically when your job starts. You will need to use a command-line interface (CLI) text editor to open the above Slurm job file on the Slurm login node. If you have never used a Linux CLI text editor, nano is a great option for beginners. Here is a YouTube video that does a great job of introducing you to nano: https://www.youtube.com/watch?v=g2PU–TctAM
In the sbatch files above you see a number of #SBATCH lines. These are Slurm job parameters that will define how Slurm is going to run your job on the cluster. You can edit these to your requirements. For now, I recommend you only change the ‘–mail-user’ parameter to your email address and submit the Slurm job.
Explanation of #SBATCH Options
Note
--job-name Job name shown in queues/logs.
--mail-user Email address to where you want to receive Slurm notifications.
--mail-type Events to notify in the Slurm email (BEGIN, END, FAIL).
--clusters Which cluster you want to run your Slurm job (eg. srf_gpu_01)
--partition Partition/queue (e.g., standard-gpu).
--gres=gpu:1 The number of GPU you’re requesting, eg 1 GPU.
--cpus-per-task The number of CPU cores you want assigned per task.
--mem How much memory allocation you’re requesting (e.g., 4G).
--time Maximum runtime/timelimit (HH:MM:SS).
--output Where you want Slurm to output/write the Slurm job log file (%j = job ID).
The PyTorch test Slurm job
The example Slurm job uses the HPC Environment Modules system.
The following lines initialise the shared software environment:
source /etc/profile.d/modules.sh

module purge
module use /apps/modulefiles/Core
The following line loads a centrally managed PyTorch environment:
module load pytorch/cu124-py311
This provides a ready-to-use GPU-enabled PyTorch installation across all compute nodes.
You can see available software with:
module avail
Submitting the Slurm job
On the login node (eg slurm-hn04) type the Slurm batch job submission command into the terminal:
For the PyTorch sbatch file:
sbatch test_pytorch_gpu.sbatch
When you press ENTER, if everything went well, the terminal will return a message like:
Submitted batch job 9616 on cluster srf_gpu_01.
Each job is assigned a unique job ID by Slurm. In the above example, the Slurm job ID is 9616.
Viewing the Slurm job queue
Now that your job is running, you can view its status in the job queue:
squeue -M all --me
This will list all Slurm jobs belonging to you, that are running on any of the clusters:
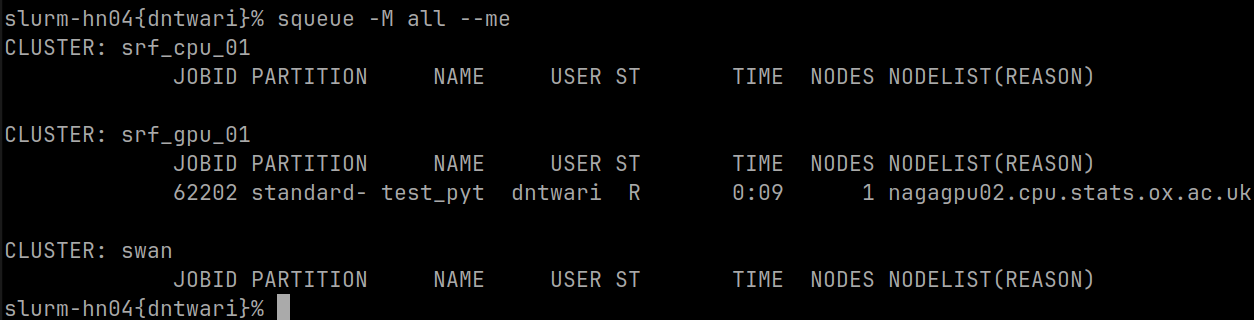
In the screenshot you can see Slurm job 62202 running on the srf_gpu_01 cluster, specifically on the GPU compute node nagagpu02.
If you see something similar for your job, congratulations, you’ve just submitted your first Slurm job to the Department of Statistics HPC!
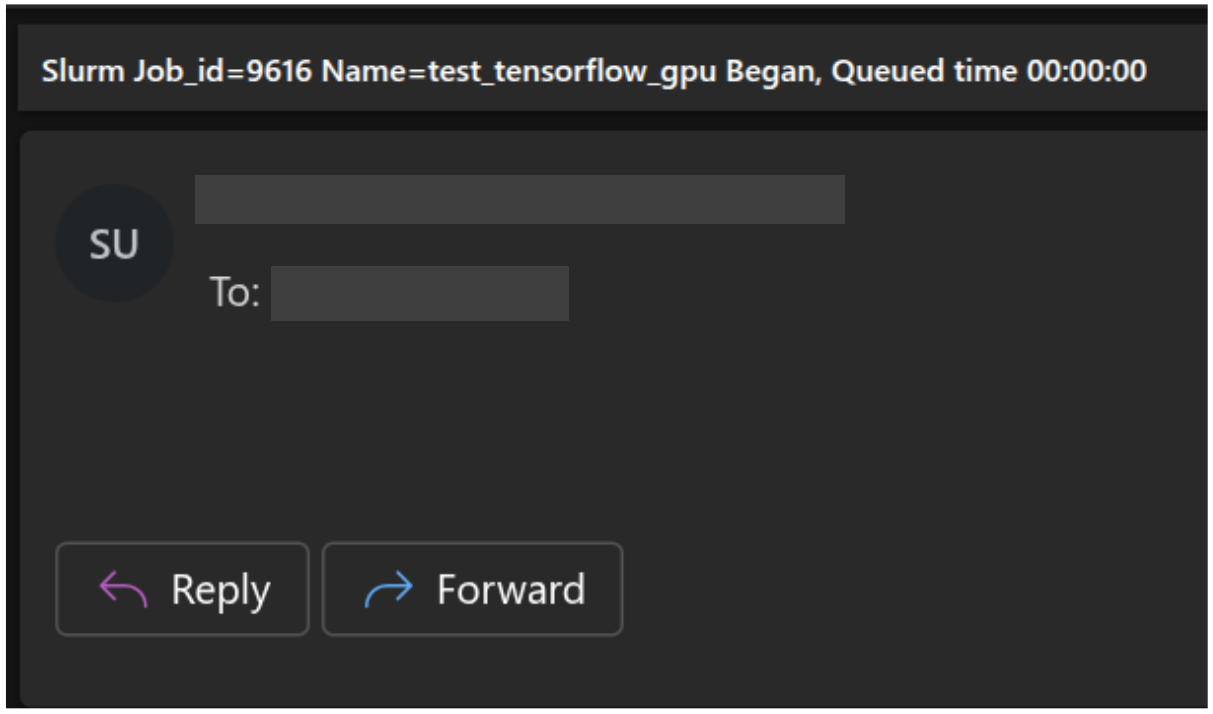
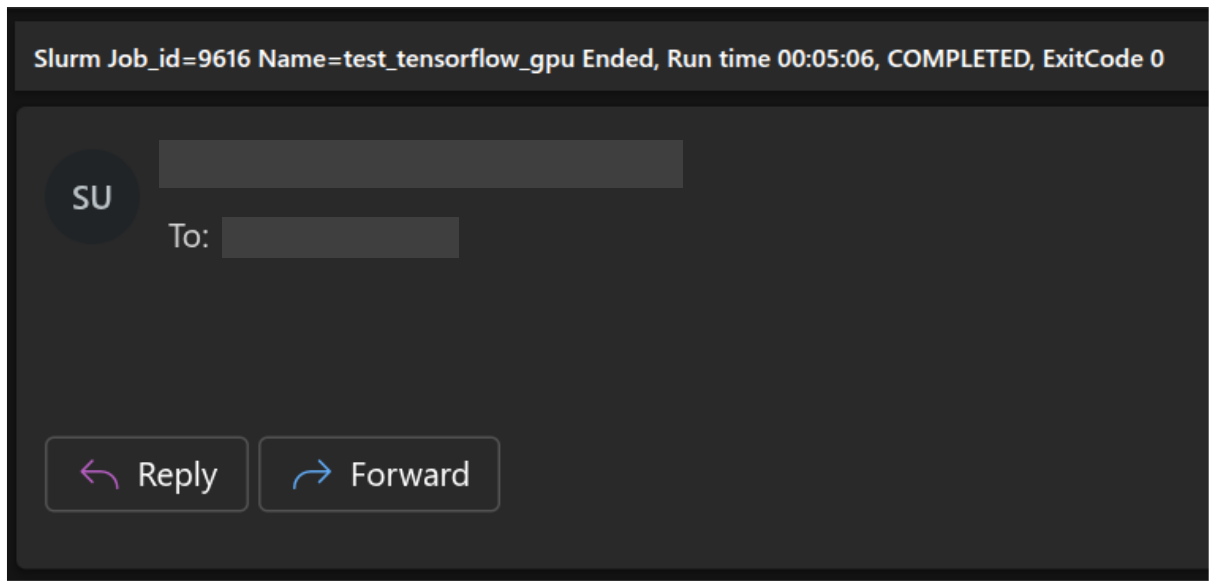
If you set your email in the Slurm job file, you will have received two emails from the HPC. One at the beginning of the job, when you submitted the job and Slurm ran it on the HPC, and one at the end of the job, when the job completed.
Job begins:
Job completed:
Reviewing your job results
Once this test Slurm job has completed, you can open (eg with nano) the Slurm job log
file you defined in the job file. In this example, it’s located in the folder myslurmlogs/
and is called test_pytorch_gpu_9616.out <– is the Slurm job ID I received when I ran the
job at the time of writing this tutorial. Your individual Slurm job IDs will be different and
unique.
$ nano ~/myslurmlogs/test_pytorch_gpu_......out
Output of test_pytorch_gpu_9616.out:
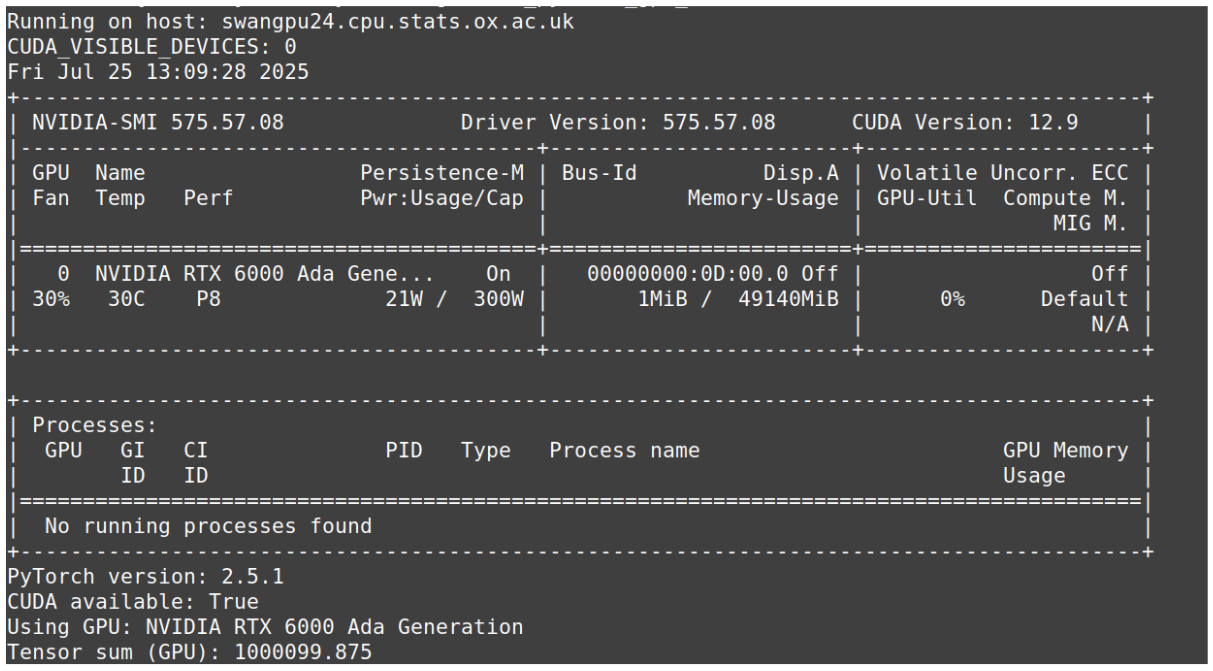
The first two lines in the above screenshots are the outputs of:
echo "Running on host: $(hostname)"
echo "CUDA_VISIBLE_DEVICES: $CUDA_VISIBLE_DEVICES"
And then from Fri Jul 25... to No running processes found you have the output of the nvidia-smi command, which is showing the GPU information for the cluster node this Slurm job ran on. Which in this case was swangpu24.cpu.stats.ox.ac.uk.
And the remaining lines are from PyTorch.
If you need similar guides or software installations on the HPC, please let me know at ithelp@stats.ox.ac.uk
Next Steps
Once you are comfortable submitting basic Slurm jobs, you may also wish to explore:
Topics include:
Conda and Pixi environments
GPU software environments
temporary scratch storage
shared project storage
Julia and AI/ML environments
Useful links on Getting Started with Linux, HPC, and Parallel Programming for AI/ML and HPC
Linux
Introduction to Linux (LFS101) https://training.linuxfoundation.org/training/introduction-to-linux/
HPC
Introduction to Parallel Computing Tutorial https://hpc.llnl.gov/documentation/tutorials/introduction-parallel-computing-tutorial
Python (with PyTorch)
Getting Started with Distributed Data Parallel https://docs.pytorch.org/tutorials/intermediate/ddp_tutorial.html
Introduction to High-Performance Computing in Python https://www.hpc-carpentry.org/hpc-python/
R (programming language)
R doParallel: A Brain-Friendly Introduction to Parallelism in R https://www.appsilon.com/post/r-doparallel
CRAN Task View: High-Performance and Parallel Computing with R https://cran.r-project.org/web/views/HighPerformanceComputing.html